DeepL translator now available as desktop app

DeepL.com is currently the best AI translator* and is now available as an app for Windows and macOS. This means that users will no longer have to copy text back and forth between their application and the DeepL website:

DeepL for Windows welcome screen

Just like the website, the app is able to provide alternatives to the suggested translations and adapts the rest of the sentence, if necessary:

DeepL app for windows screenshot

The limit of 5000 characters per translation can be lifted by signing up for a DeepL Pro plan.

Wondering why the download for Windows has an impressive size of 135 MB? This is mainly due to the use of the Chromium Embedded Framework, which is included both in a 32 bit and 64 bit version.

*Is the Deepl.com the best AI translator? I think so. Like everything on this blog, this is just my opinion. However, as someone living and working in Luxembourg, a country with three official languages, I sure appreciate DeepL.com a lot.

Alternative apps

QTranslate has been around for several years, is also available for free and integrates several different translation services (including DeepL):

QTranslate screenshot

It has additional features like image text recognition, text to speech synthesis and searching in online and offline dictionaries. However, it seems that it can only provide alternative translations for single words. The size of the download is less than 1 MB.

Reading the version from a ClickOnce .application file

ClickOnce .application files contain an assemblyIdentity element with a version attribute:

<?xml version="1.0" encoding="utf-8"?>
...
  <assemblyIdentity name="Simple Data Logger.application" version="1.1.2.1" publicKeyToken="0c3a74e9157b5601" language="en" processorArchitecture="msil" xmlns="urn:schemas-microsoft-com:asm.v1" />

An easy way to read this version string is:

var assembly = XElement.Load(uri);
XNamespace ns = "urn:schemas-microsoft-com:asm.v1";
remoteVersionString = assembly.Element(ns + "assemblyIdentity").Attribute("version").Value;

You can use this to create a Version object:

var version = new Version(remoteVersionString);

Note: The code above runs synchronously and blocks your application. To avoid this, you could run it in as a task on the thread pool with Task.Run() or you could use XElement.LoadAsync instead of XElement.Load(), if available.

Excel: How to calculate time differences beyond midnight

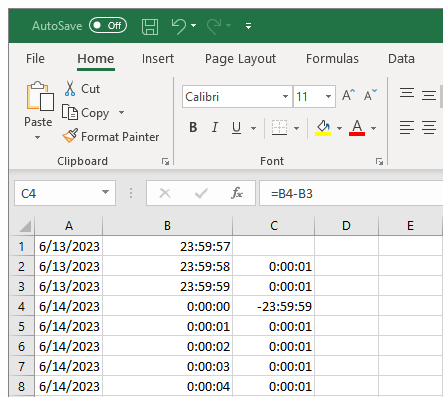
Suppose you have a document with a date and time column. Calculating time differences is easy, you can simply subtract an earlier time from a later one1. In the screenshot below, column C shows the difference between the time in consecutive rows (column B). However, you can see that this simple approach fails just after midnight:

Excel: Simple time difference calculation fails at midnight

The time difference in row 4 is negative and also wrong. This becomes very clear when you switch to a 24h time format and enable negative times2:

Excel: Time difference calculation fails at midnight
Did you notice that the dates in column A have changed? This was due to the method I used to enable negative time values (see note 2 below).

Solution: Include the date in the calculation

Internally, dates are represented as whole numbers and times as fractional numbers smaller than 1 (1 would be 24h = 1 whole day). This means you can simply add date and time! Therefore, a better formula to calculate time differences is:

=A2+B2-(A1+B1)

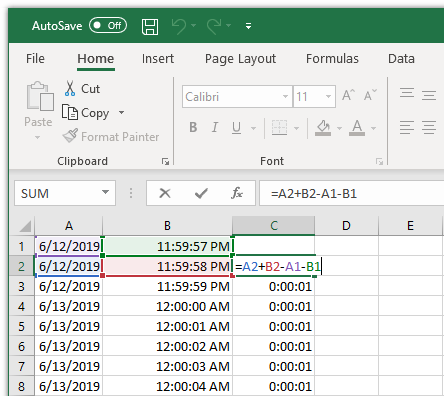
By including the date, this formula works fine after midnight.

What if you don’t have a date column?

You can use a clever approach I found here:
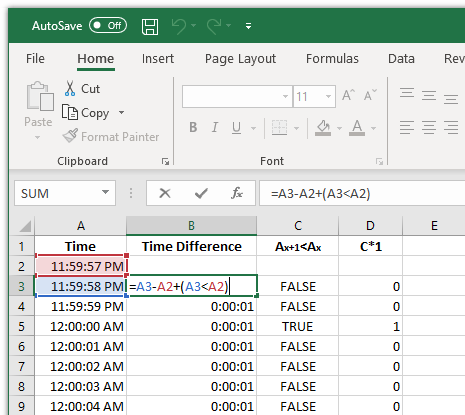
Columns C and D included for explanatory purposes
=A3-A2+(A3<A2)

A3-A2 is the simple time difference calculation we used in the beginning. (A3<A2) returns TRUE only when the next day starts and the time is “smaller” than in the row above (see row 5, column C). What makes this work for our purposes it that TRUE is evaluated as 1 while FALSE is 0 (see column D). As mentioned above, a date/time value of 1 corresponds to 1 day (24h).

In row 5, Excel is therefore calculating the difference between 24h and 23h 59min 59s, which is 1 second.


1 This will work if Excel correctly recognized the value as a time (not a text). You can test this with the ISNUMBER function which should return TRUE.
2 The easiest way to get Excel to show negative times is by enabling the 1904 date system in the advanced options.
3 If you want to see time values of 24h or more, use an elapsed time format with square brackets, e.g. [h]:mm:ss instead of h:mm:ss.

Thoughts on Form W-8BEN-E for companies selling software licenses

Your company is selling software and a customer in the U.S. is asking you for form W-8BEN-E? You should supply it or risk having 30% of your payment withheld. Some customers might also not place an order at all before receiving this form.

Disclaimer: This blog post is presented for educational and entertainment purposes only. I originally wrote the instructions below for my own company. They might be incomplete, wrong or not applicable to your situation.

Preliminary considerations

  • What are software licenses (in tax treaty terms)? For this article, I’m assuming they fall under royalties / copyright.
  • Does your country have a tax treaty with the U.S.? How much will you save by filling out from W-8BEN-E? Download table 1 (tax rates…) from this IRS page, find your country and look up the royalties / copyright tax rate:

    Luxembourg US tax treaty: royalties
    Points at Malta: Ha-ha!

Official information

Other links you might find useful

Instructions for filling out form W-8BEN-E

Part I – Identification of Beneficial Owner

Complete line 1 and 2

Check “Corporation” on line 4 (if you’re not working for a corporation, you’re probably reading the wrong blog post).

Skip line 5 (FATCA status) entirely. Software licenses are excluded from the FATCA definition of “withholdable payment” [see: Experis – Finance FATCA Checklist for Multinational Companies (PDF); EY – Information reporting and withholding: the impact of Foreign Account Tax Compliance Act (FATCA) on multinational organizations (PDF)].

Enter address on line 6.

Provide a US taxpayer identification number (TIN) in the form of an employer identification number (EIN) on line 8 or the tax ID assigned in your country on line 9b.

Part III – Claim of Tax Treaty Benefits

Line 14a: Check the box and enter your country.

Line 14b: Check the box at the beginning. Will you have to check another box below? The official instructions say:

If you are a resident of a foreign country that has entered into an income tax treaty with the United States that contains a limitation on benefits (LOB) article, you must complete one of the checkboxes in line 14b. You may only check a box if the limitation on benefits article in that treaty includes a provision that corresponds to the checkbox on which you are relying to claim treaty benefits. A particular treaty might not include every type of test for which a checkbox is provided.

To find out if your country’s tax treaty includes a LOB article (it most probably does), go to the IRS tax treaties tables page and look up your country in table 4 (limitation on benefits). You can find the complete text of the tax treaty through this page and read the articles mentioned in table 4. The official instructions for form W-8BEN-E also contain summarized versions of the LOB tests which might be useful. You should then be able to figure out which box to check.

Line 15: As far as I understood the instructions, this line has to be filled out only “if the treaty contains different withholding rates for different types of royalties.”[see IRS instructions]. Remember table 1 from the very beginning of this blog post? Look at it again. Are all royalties rates the same? If yes, skip line 15, otherwise, fill it in. As “n/a” is not a rate (I hope), I skipped this line (all rates were the same for Luxembourg).

Part XXX – Certification

Sign, fill in print name and date in U.S. format, check the box at the bottom.

Even though I really don’t want to deal with this topic again, I’ll leave the comments open so that you can correct me on all that’s wrong with my instructions. However, please don’t ask me to help you fill out form W-8BEN-E for your company!

Solution: The target version of the .NET Framework in the project does not match the .NET Framework launch condition version

The problem:

You’re building a setup project in Visual Studio (aka deployment project or installer project) and find the following warning in the build output:
The target version of the .NET framework in the project does not match the NET framework launch condition version...
The target version of the .NET framework in the project does not match the NET framework launch condition version…

Why this is happening:

The project you want to deploy (using the setup project) targets a more recent .NET Framework than specified in the setup project’s launch conditions. In my case, the project targets .NET Framework 4.7:
application target .NET framework
Double click on ‘Properties’ in the Solution Explorer to show this screen.
Meanwhile, the setup project was still checking for .NET Framework 4.6.1 as a launch condition (requirement on the target machine).

The solution: Update the launch condition version to match the target framework of your project.

In the Setup Project, double click on ‘Microsoft .NET Framework’ to show its properties. Then change the .NET Framework version in the dropdown list: launch condition .net framework version

Update April 2024: What about .NET Core and later .NET versions?

There’s nothing shown under “detected dependencies”, so changing the target framework as shown above is not possible. Note that this issue only appeared after  I upgraded a .NET framework solution to .NET 8 and tried reusing the installer project. Opening the .vdproj file and removing the reference to .NET framework fixed the issue:
.vdrpoj file of the installer project

One more thing: Check the prerequisites

While this has nothing to do with the warning, you might as well check which version of the .NET framework your setup program will install (if any). Right click on the setup project and select ‘Properties’. In the Property Pages dialog, click on ‘Prerequisites…’: setup program prerequisites