You’re building a setup project in Visual Studio (aka deployment project or installer project) and find the following warning in the build output:The target version of the .NET framework in the project does not match the NET framework launch condition version…
Why this is happening:
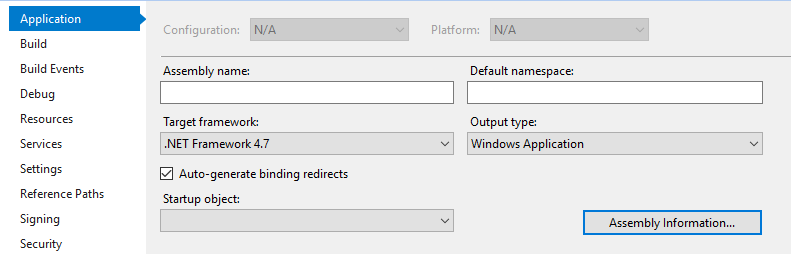
The project you want to deploy (using the setup project) targets a more recent .NET Framework than specified in the setup project’s launch conditions. In my case, the project targets .NET Framework 4.7:Double click on ‘Properties’ in the Solution Explorer to show this screen. Meanwhile, the setup project was still checking for .NET Framework 4.6.1 as a launch condition (requirement on the target machine).
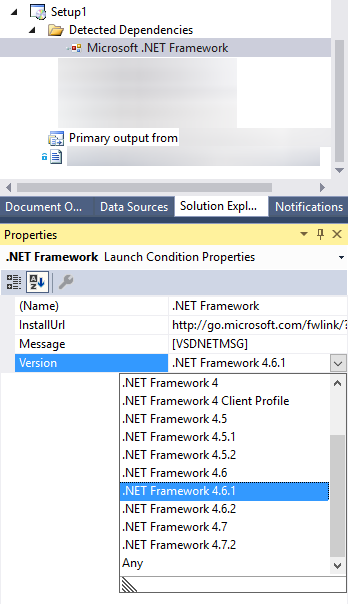
The solution: Update the launch condition version to match the target framework of your project.
In the Setup Project, double click on ‘Microsoft .NET Framework’ to show its properties. Then change the .NET Framework version in the dropdown list:
Update April 2024: What about .NET Core and later .NET versions?
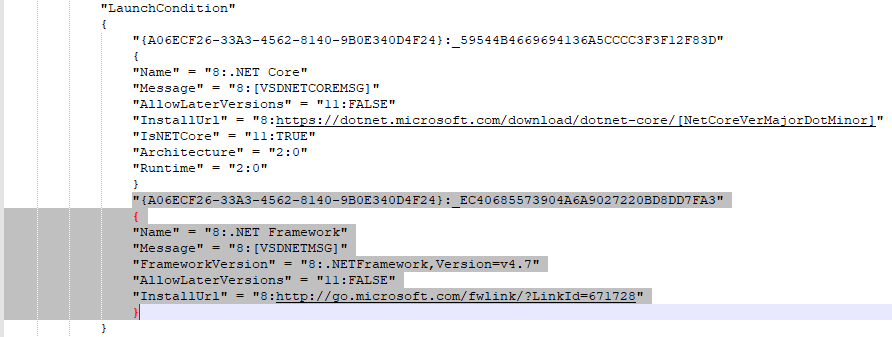
There’s nothing shown under “detected dependencies”, so changing the target framework as shown above is not possible. Note that this issue only appeared after I upgraded a .NET framework solution to .NET 8 and tried reusing the installer project. Opening the .vdproj file and removing the reference to .NET framework fixed the issue:
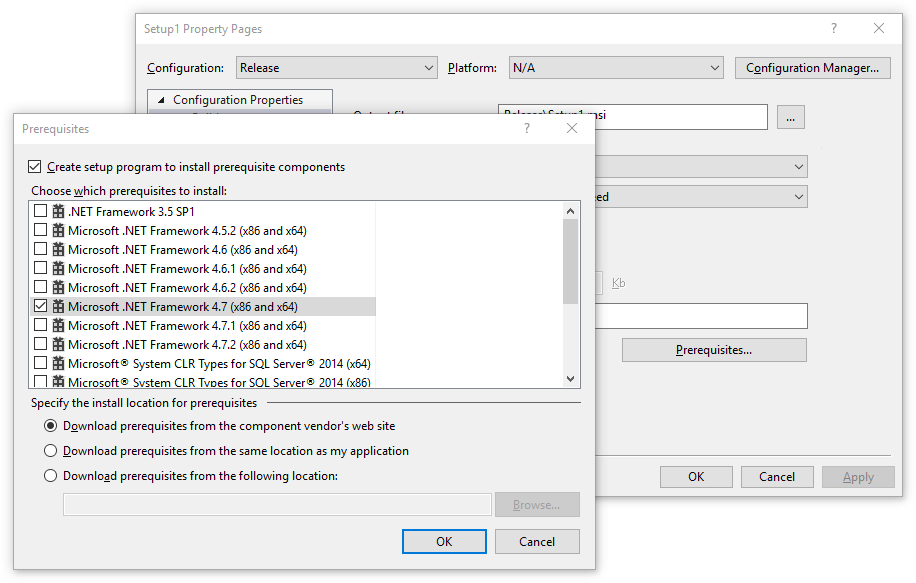
One more thing: Check the prerequisites
While this has nothing to do with the warning, you might as well check which version of the .NET framework your setup program will install (if any). Right click on the setup project and select ‘Properties’. In the Property Pages dialog, click on ‘Prerequisites…’:
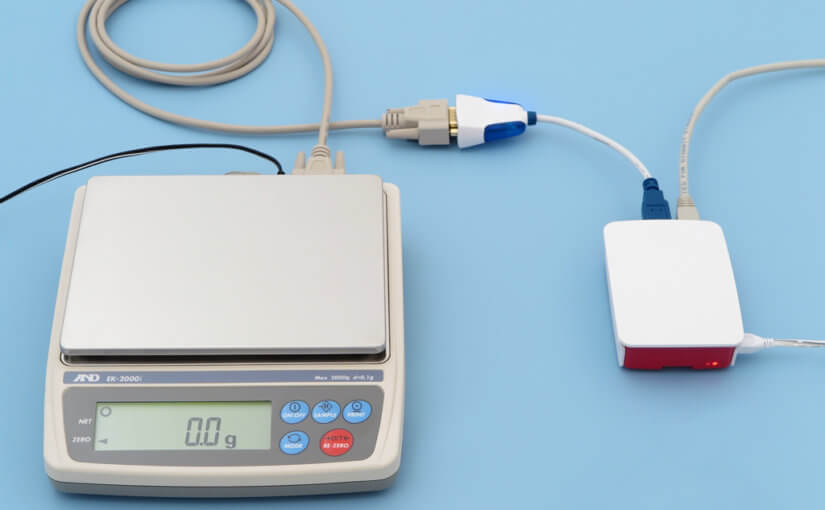
Build a protocol converter. Most scales use proprietary protocols, but you can convert the data to MQTT or other protocols as shown here. Do not say that you have developed a protocol converter, call it an IoT gateway to get more attention.
Use speech synthesis to output the weight as spoken words for visually impaired users.
Use speech recognition to send commands to the scale (e.g. the tare command).
Install a Pi Camera Module and take a picture of the user every time the scale is overloaded.
Turn the scale into a checkweigher by comparing the weight with preset values and making under/accept/over LEDs light up.
Transform the weight into a proportional analog signal (voltage) because… I have no idea! Why do people keep asking for weighing scales with an analog output? Seriously, if you know the answer, please tell me.
Trigger an alarm or something worse when an object is removed from the scale:
Raiders of the Lost Ark IMAX Movie CLIP - Throw Me the Idol (2012) - Harrison Ford Movie
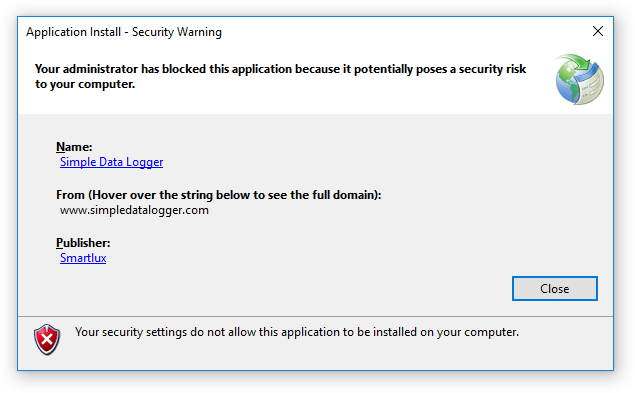
The Problem: Your administrator has blocked this application…
You’re trying to install a ClickOnce application and get an error message saying: “Your administrator has blocked this application because it potentially poses a security risk to your computer”:
You are the administrator and don’t remember blocking any applications (if you’re not the admin, contact them instead of reading this article).
The reason this is happening
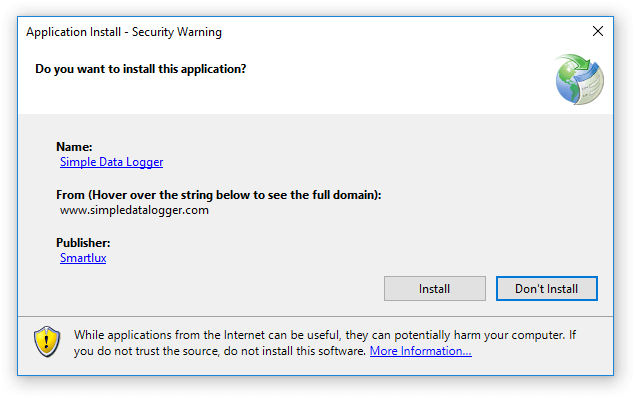
The ClickOnce trust prompt is disabled on your operating system, so instead of a dialog (prompt) which allows you to either proceed with the installation or not, you just get the message above.
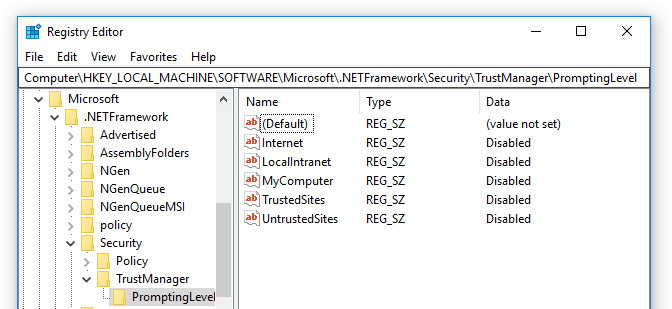
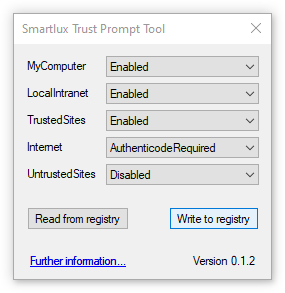
There should be five subkeys, one for each security zone:
Each subkey can have one of the following values:
Disabled: No trust prompt is shown, instead you get the error message above.
Enabled: A trust prompt is shown.
AuthenticodeRequired: A trust prompt is shown only for signed applications (other applications cannot be installed).
Trust prompt example
If the application you’re trying to install has been published on the Internet, you’ll want to set the Internet subkey to “Enabled” (or to “AuthenticodeRequired” if the application has been digitally signed). You should then see a trust prompt instead of the “your administrator has blocked this application” error:
Free Trust Prompt Tool
As an alternative to editing the registry manually, you can also use a free trust prompt tool I wrote:
It allows you to easily display and modify the trust prompt configuration.
Notes:
If you don’t trust yourself or other people using your PC, you can change the respective zone setting back to “Disabled” after installing the ClickOnce application. The trust prompt configuration has no effect on installed applications and their updates.
You could also add the publisher’s site to your trusted sites and only enable trust prompts for the TrustedSites subkey.
Are you wondering why all your trust prompt settings have been changed to “Disabled”? Unfortunately, I have no idea. I’ve had this happen on multiple PCs and I’m pretty sure I didn’t do this myself.
I confirmed that the Windows display language was set to English. I tried deleting the German language pack, but it did not make a difference: my Windows was still bilingual.
We use FastSpring to sell our software, which means that our account balance is in USD. FastSpring can pay out in EUR to a SEPA bank account, but new FinTech companies seem to offer better exchange rates.
Transferwise is one of these companies. Their bordereless account (which is not the same as their regular account) makes it possible to get paid by FastSpring to a US bank in USD (for free), convert the payment into EUR at Transferwise’s advantageous rates and withdraw it to a EUR account.
1. Sign up for a Transferwise borderless account
Click here and apply (this should direct you to the borderless signup page). You can also click on this affiliate link to get a free transfer and to support this blog, but please note that this will send you to the regular Transferwise signup page.
It took quite a while for Transferwise to open our borderless account. If you don’t hear from them within a few business days, I recommend logging in to check if further documents are required.
2. Activate USD as a currency and get your bank details
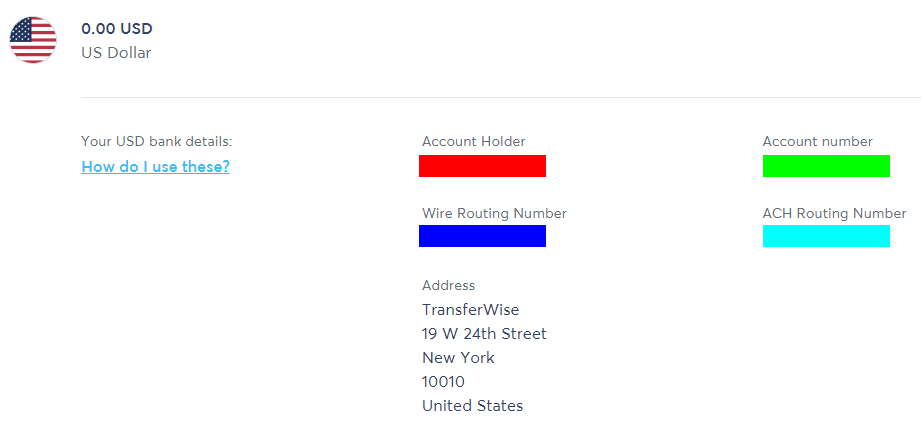
After logging in to your borderless account, you’ll be able to activate currencies. Obviously, you’ll need USD to get paid by FastSpring. Activating USD as a currency also gives you your USD bank details.
I strongly recommend clicking on the “How do I use these?” link to learn more about using your USD bank details.
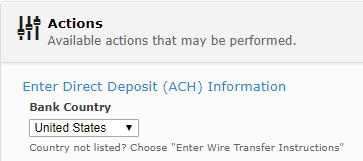
3. Enter your bank details in your FastSpring account
Things get a bit more difficult here. In your FastSpring account, go to “Payment Methods”, set the bank country to “United States” and click on “Enter Direct Deposit (ACH) Information”:
Note that these are the instructions for FastSpring’s “Classic Springboard”, things will look different if you’re using the more recent “contextual” dashboard.
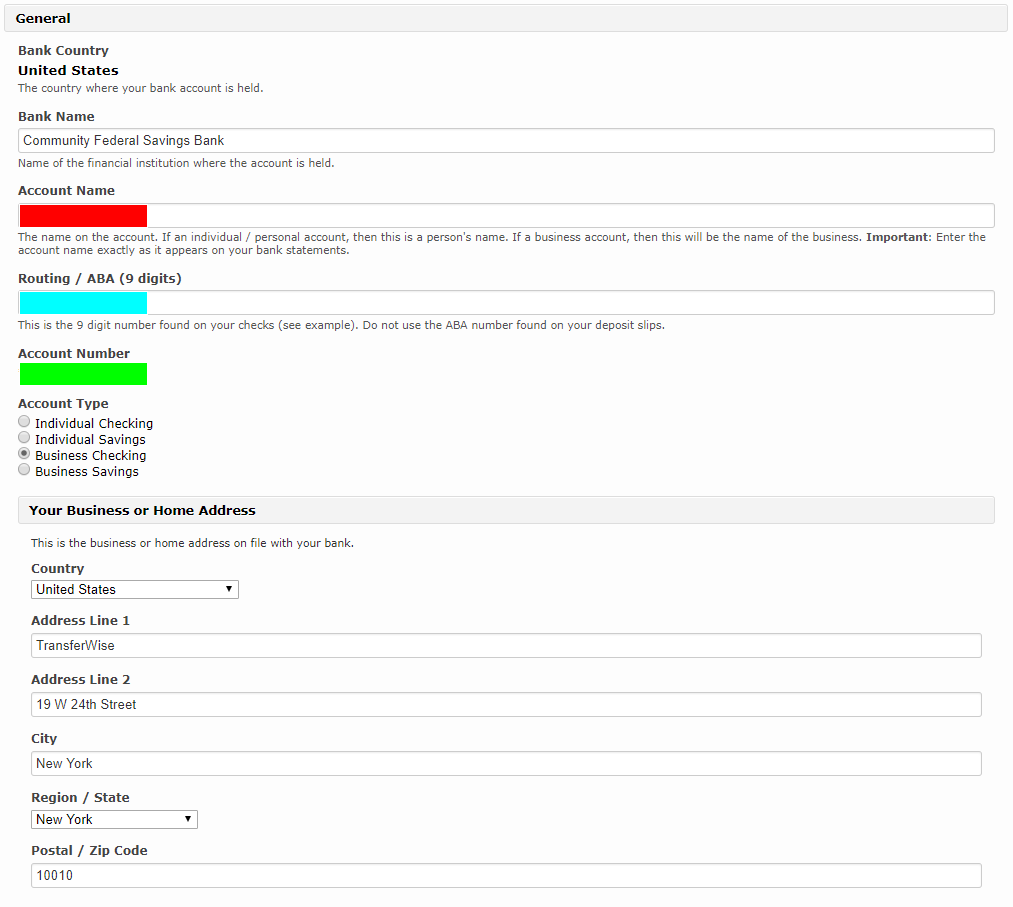
Transferwise gives you all the bank details you’ll need to enter with the exception of the bank’s name. However, you can easily find the name by either entering your wire routing number (a.k.a ABA routing number) on this website or by entering your ACH routing numberhere. In our case, both numbers returned “Community Federal Savings Bank” as the bank’s name.
To make things more confusing, FastSpring asks for a “Routing / ABA (9 digits)” number. Do not actually enter the wire routing number (a.k.a ABA routing number) here! Instead, enter the ACH routing number (FastSpring customer support has confirmed that this is correct).
Transferwise recommends choosing “checking” and not “savings” as the account type, so I selected “Business checking”.
My completed form (colors match the colors used above):
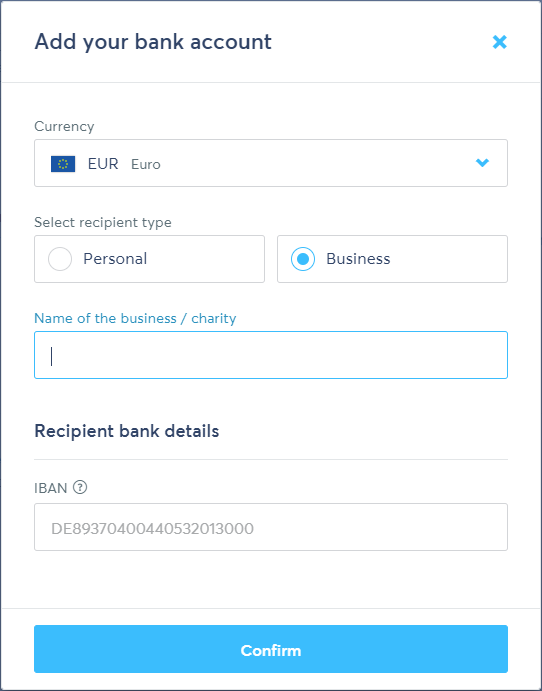
4. Add your EUR bank account to Transferwise
Transferwise will notify you when you’ve received a new payment. In order to withdraw it, you first have to add a bank account:
5. Convert and withdraw your money in EUR
You can then convert your USD to EUR and send them to your account in one step:
Transferwise will show you the exchange rate and the fees (1% for USD to EUR). Soon afterwards (on the next business day in our case), your money will show up in your EUR bank account.